This website contains affiliate links. As an Amazon affiliate, I earn from qualifying purchases (What’s This?).
Last weekend, I had one goal: bake something ridiculously over-the-top. You know, the kind of dessert that makes you feel like you’re in a Paris café, even if your actual view is a stack of laundry and a curious cat eyeballing your butter.
I’d been eyeing this Classic French Opera Cake recipe for ages, similar to how I tried my hands on the Lavender and Honey Crème Brûlée. Something about the layers, the gold leaf, the drama of it all—it had “slow Sunday baking project” written all over it. And friends, it did not disappoint.
So here’s how it went down (with a little powdered sugar in my hair and zero regrets).
Why You’ll Love This Recipe
This cake is a moment. Seriously.
It’s not just a dessert, it’s a little weekend escape wrapped in layers of espresso, chocolate, and that dreamy coffee buttercream. Making it felt like a mini Parisian getaway, minus the jet lag (and plus a few dishes).
Here’s why I think you’ll fall for this Classic French Opera Cake the way I did:
✓ It’s a showstopper. From the glossy glaze to that gold leaf sparkle, she’s stunning. Your guests will gasp. You might even gasp.
✓ The flavors are deep, rich, and cozy. Imagine a French dessert with a soul-soothing blend of bold coffee and dark chocolate, all mellowed by almond sponge and buttercream. It’s luxurious but not fussy.
✓ You get to feel very accomplished. There’s something satisfying about building all those beautiful layers. It’s like baking and crafting had a baby.
✓ It’s way more forgiving than it looks. I messed up a corner and patched it with ganache. No one noticed. Everyone still swooned.
✓ It’s perfect for celebrations, or no reason at all. I made mine just because I wanted to. And honestly? That made it even better.
It’s rich, it’s rewarding, and it tastes like something you’d pay way too much for at a fancy café, but you made it, in your own cozy kitchen, probably in slippers.
You’ll love it. Promise.
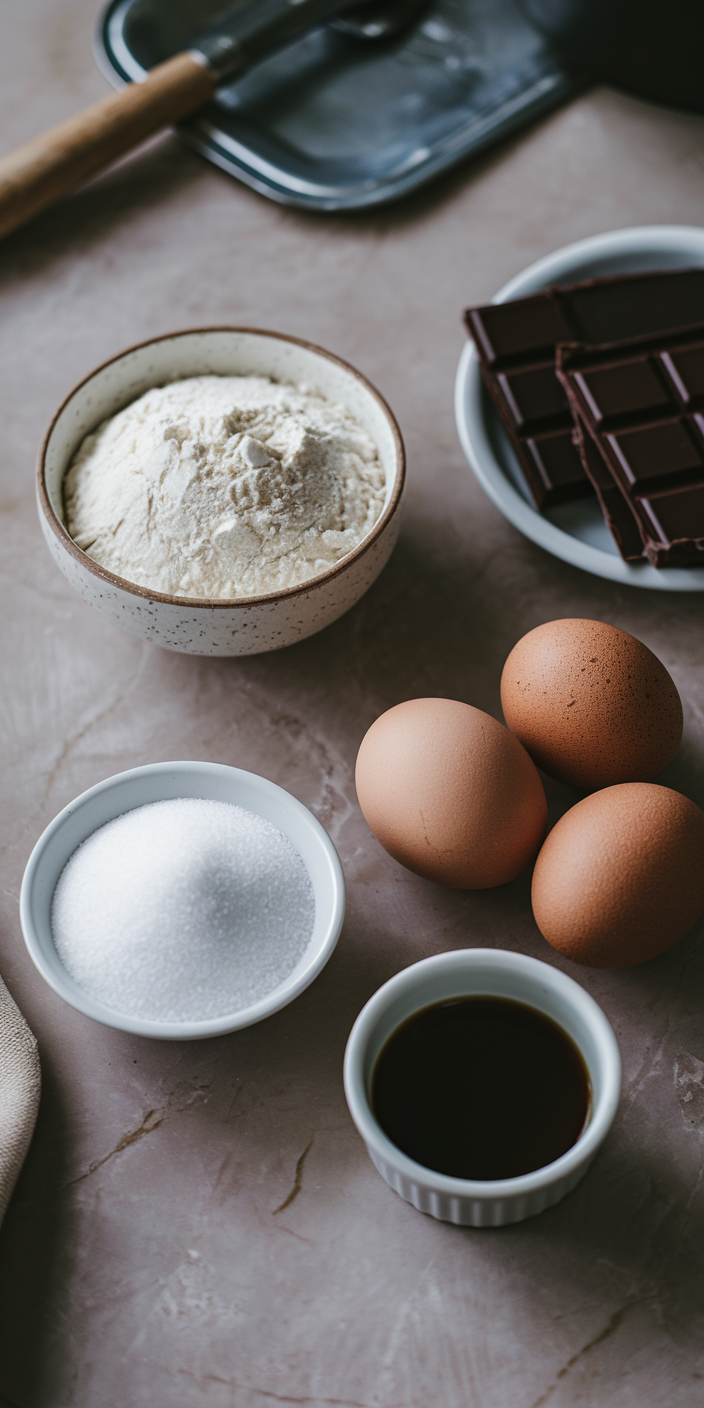
Here’s What You’ll Need
Before I get into the full recipe ingredients and instructions. I want to get clear that this is an inspired version I’ve learned from Louise Lindberg Pastry.
There are a couple of differences here. The first difference is, I’m not Louise Lindberg, which means the flavor will not turn out the same. Add or remove any ingredients that don’t fit your taste.
The next difference is with the decoration on the cake. I just love the gold leaf vibe, so I didn’t do all that spiral action you see on Louise Lindberg’s cakes.
Everything else, I tried to follow as closely as possible to come up with my own version.
You can do that too.
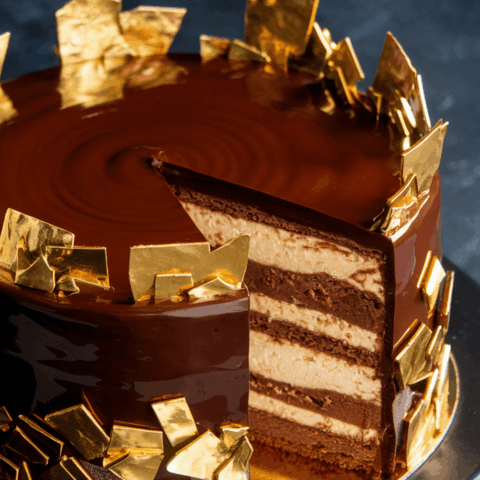
The Layers That Make Up The Classic French Opera Cake
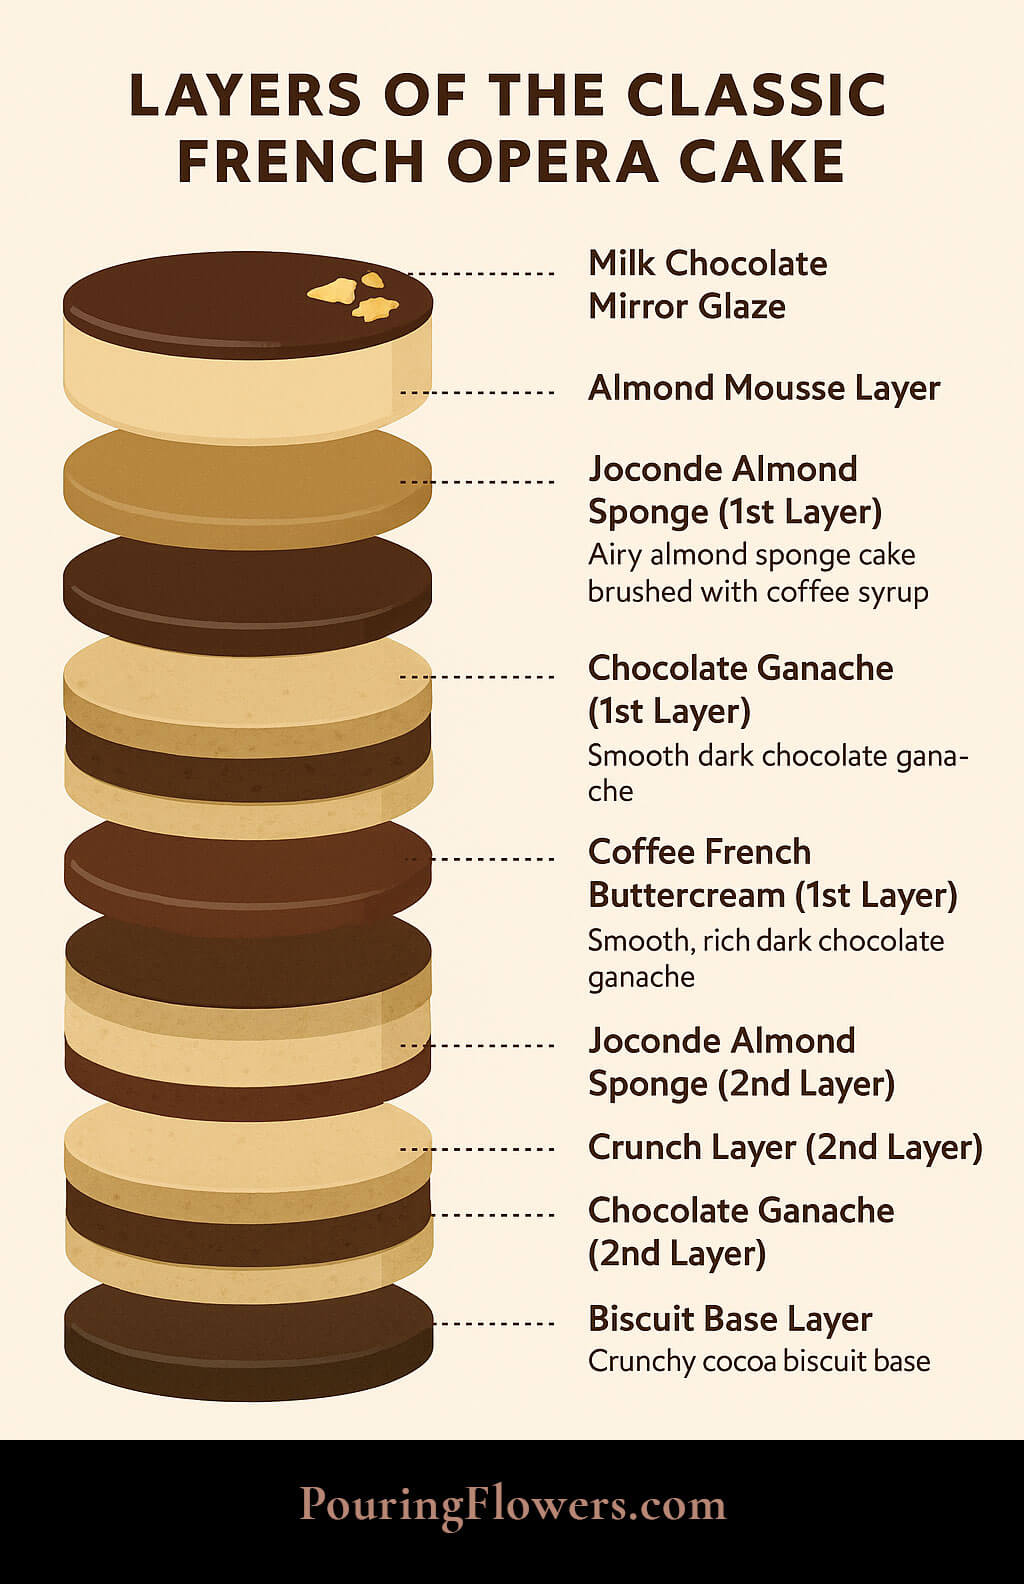
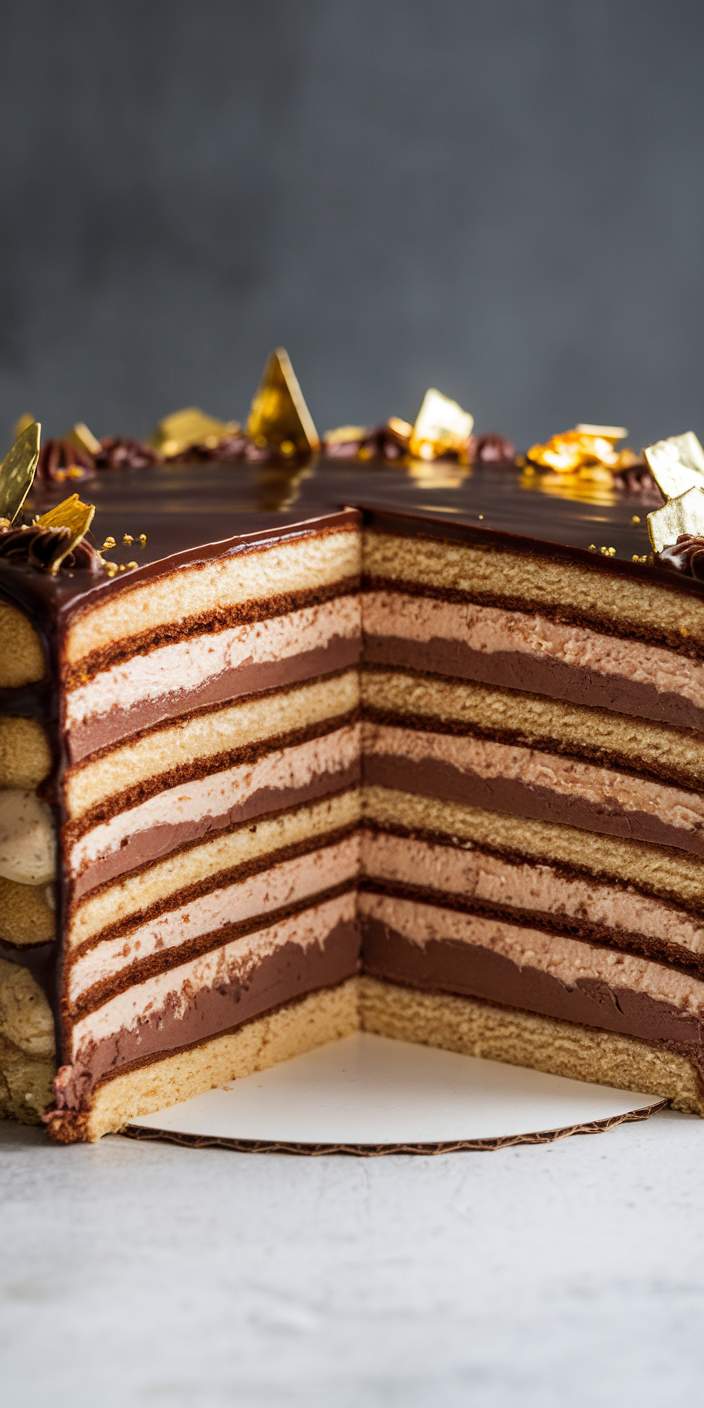
You can’t make a classic French opera cake without the grandeur of the inside layers.
We’re making a 5-layer sequence and stacking it twice for height and drama. Each sponge gets brushed with coffee syrup. Each ganache and buttercream adds depth. Freeze between each layer to keep it clean and sharp.
Here’s the full breakdown:
- Biscuit Base Layer
- A thin, crunchy cocoa biscuit base made from crushed biscuits, cocoa, espresso powder, and butter.
- Joconde Almond Sponge (1st Layer)
- Airy almond sponge cake brushed with coffee syrup.
- Crunch Layer (1st Layer)
- Made with milk chocolate, Nutella, cocoa powder, and feuilletine for texture.
- Chocolate Ganache (1st Layer)
- Smooth and stable dark chocolate ganache (55%) with butter.
- Coffee French Buttercream (1st Layer)
- Made with egg yolks, sugar syrup, espresso, and butter for a custard-like texture.
→ These 5 layers are then repeated again, forming a double-layer structure:
- Joconde Almond Sponge (2nd Layer)
- Crunch Layer (2nd Layer)
- Chocolate Ganache (2nd Layer)
- Coffee French Buttercream (2nd Layer)
Final Assembly (after freezing overnight):
- Almond Mousse Layer — Poured around the double-layered cake (with buttercream facing down) inside a silicone mold. Almond flavor enhanced with a touch of coffee.
- Milk Chocolate Mirror Glaze — Poured over the frozen mousse-covered cake for a shiny finish.
- Gold Leaf Garnish — Added on top and side of the cake for aesthetic purposes (decorative only, not counted as structural layers).
Ingredients List For Day By Day Prep
Day 1 – Build the Foundations
This day is all about prepping the base layers and fillings so you can layer with ease later.
1. Cocoa Biscuit Base with Coffee
- 125 g digestive or butter biscuits
- 60 g melted butter
- 1 tbsp cocoa powder
- ½ tsp espresso powder
- Pinch of salt
- A bit of melted milk chocolate (to help layers stick later)
2. Joconde Almond Sponge (you’ll need two layers)
- 170 g almond flour
- 105 g caster sugar
- 200 g eggs
- 130 g egg whites
- 55 g caster sugar (for the meringue)
- 35 g all-purpose flour
- 25 g melted butter
3. Coffee Syrup
- 50 g caster sugar
- 3 tsp espresso powder
- 60 ml water
- 2 tbsp Kahlua (optional, swap with more coffee, cognac, or brandy if you prefer)
4. Dark Chocolate Ganache
- 300 ml heavy cream
- 250 g dark chocolate (around 55%)
- 25 g butter, softened
5. Chocolate Coffee Crunch
- 45 g milk chocolate
- 1 tbsp Nutella
- 65 g feuilletine (or substitute with crushed cornflakes if needed)
- 2 tsp espresso powder
- Pinch of salt
6. French Coffee Buttercream
- 3½ tsp espresso powder
- 1½ tbsp boiling water (for dissolving espresso)
- 50 ml water
- 120 g caster sugar
- 6 egg yolks
- 230 g butter, room temperature
Day 2 – Layer, Set, Freeze
Almond Coffee Mousse (for enrobing layer only)
- 2 ⅓ (2.33) gelatin sheets (1 sheet = 1.75 g, bloom 240)
- 80 g white chocolate
- 80 g almond nut paste
(use: 80 g roasted blanched almonds, 1 tsp icing sugar, 1 tsp neutral oil) - 300 ml heavy cream
(115 ml to heat + 185 ml to whip) - 1½ tsp espresso powder
Day 3 – Mirror Glaze & Final Touch
Now it’s time for that glossy finish and gold-leaf drama.
Milk Chocolate Mirror Glaze
- 6 gelatin sheets (1.75 g each, bloom 240)
- 150 g milk chocolate
- 100 ml heavy cream
- 50 ml water
- 150 g caster sugar
- 150 g glucose syrup
- Optional: red, yellow, black, white food coloring paste (to get your ideal glaze shade)
Final Garnish
Spruce up your cake with edible gold leaf (for that luxe, elegant finish).
Tools & Equipment You’ll Need to Make This Opera Cake
- Silikomart TOR Mold (Ø18 cm) – The main entremet mold used to hold the mousse and layered cake. Its round, tall-sided design creates that clean, modern look.
- Hand Blender (Immersion Blender) – Blends ganache, mousse, and glazes into smooth, glossy perfection.
- Pastry Rings (16 cm & 18 cm) – For cutting sponge layers and shaping the base cake.
- Acetate Sheets (Tall + Narrow Strips) – For lining molds and supporting clean edges when unmolding.
- Digital Kitchen Thermometer – Needed for tempering cremeux, sugar syrups, and glazes precisely.
- Digital Scale – To measure all ingredients down to the gram (essential for pastry work).
- Small Saucepan(s) – Used throughout the recipe for heating creams, syrups, and ganache.
- Mixing Bowls (Heatproof) – For working with chocolate, egg yolks, and other components.
- Whisk (Balloon + Small) – Great for emulsifying and whipping creams or eggs.
- Hand Mixer or Stand Mixer – To make the buttercream, sponge, and meringue.
- Mini Chopper or Food Processor – Used to grind almonds into nut paste and blend biscuit base.
- Piping Bags – For layering mousse, ganache, and buttercream with control.
- Offset Palette Knife (Small & Large) – Essential for smoothing layers and glazing.
- Serrated Knife or Cake Cutter – To trim sponge layers for uniform height.
- Baking Tray + Baking Paper – About 13 by 18 inch, for baking joconde sponge.
- Fine Mesh Sieve – For straining custards and glazes to avoid lumps.
- Rubber Spatula – For folding cream and stirring chocolate.
- Glass (Flat-bottomed) – To press and level the biscuit base.
- Toothpicks or Skewers – For popping air bubbles in silicone molds.
- Cooling Rack + Baking Paper – For glazing the cake and domes cleanly.
- Gold Leaf Sheets + Tweezers – The final flourish. Adds that luxurious, fluttery touch on top that turns heads and makes your guests think you ordered it from a fancy patisserie.
How To Make This French Opera Cake

Cocoa Biscuit Base with Coffee (My No-Bake Shortcut Layer)
Let’s start at the bottom, literally. This biscuit layer is the crunchy foundation that holds the entire cake together. And the best part? No baking needed.
Here’s what I did:
I tossed about 125g of Digestive biscuits into a blender and pulsed until they turned into fine crumbs. You could also use any plain butter biscuit you have on hand, just make sure they’re not too sweet. I like the subtle saltiness to balance out all the cream and chocolate coming later.
In a small saucepan, I melted 60g of butter. Once it was completely liquid, I poured it over the crumbs in a mixing bowl, then added:
- 1 tablespoon of cocoa powder
- ½ teaspoon of espresso powder (this deepens the flavor so it’s not just “chocolatey”, it’s moody café chocolate)
- a pinch of salt to round everything out
I stirred until everything was evenly coated and looked like damp soil, not too greasy, but it clumped together when pressed. That’s how you know it’s just right.
Then, I pressed the mixture firmly into the bottom of a 6-inch pastry ring. I lined the inside with a tall acetate strip (helps with clean edges later) and placed baking paper underneath so I could easily lift it later.
To even everything out, I grabbed a flat-bottomed glass and gently pressed down the crust until it looked smooth and snug in the ring, kind of like tucking in a cozy blanket.
Once the base felt solid and uniform, I popped it into the fridge to chill. This step’s important, giving it time to firm up ensures the layers that come next won’t slide around or sink into the biscuit later on.
Joconde Almond Sponge Cake (Delicate, Nutty, and So Worth It)
This sponge is soft but structured, the kind of cake layer that bends without breaking, soaks up syrup like a dream, and plays well with every rich filling you’ll layer on top. It’s almond-based and super light, which gives the cake that classic opera texture.
Here’s how I made it:
I started by whisking together 170g almond flour, 105g caster sugar, and 200g whole eggs in a large mixing bowl. (That’s about 4 eggs, give or take.) You want to whip until the mixture gets thick and pale, like a smooth, creamy batter with a bit of volume.
Next, I moved to a clean bowl and made a meringue using 130g egg whites and 55g caster sugar. Whip it until you get stiff peaks that stand up on their own, they should be shiny and stable, not soft or runny.
Now comes the folding. I added the meringue to the almond mixture gently, in a couple of parts, folding slowly with a spatula. The goal is to keep as much air in the batter as possible, so no rushing here.
Once combined, I sifted in 35g of plain flour and folded that in just until I couldn’t see any dry bits. Then I poured in 25g of melted butter and folded again, just enough to bring it together. You don’t want to overmix.
I lined a flat baking tray with parchment and gave it a quick spray of non-stick just to be safe. The batter went right in, and I spread it out as evenly as I could with an offset spatula. This layer bakes fast, so an even surface is key.
Into the oven it went, 210°C (conventional oven) for 7 to 9 minutes. You’re looking for a soft golden color and a gentle spring when you touch the center.
Once baked, I let the sponge cool in the tray. Then I used a 16 cm pastry ring to cut out two rounds. If your sponge bakes up a bit thick (mine sometimes does), just trim the tops so each layer is about 1.3 cm tall. That way, your final cake doesn’t get too bulky or uneven.
I wrapped the sponge rounds in cling film and left them at room temperature until I was ready to build the cake.
You’ll be brushing them with syrup later, but for now, you’ve got two perfectly prepped almond sponge layers that smell like a patisserie.
Time to keep going.
Coffee Syrup (The Flavor Booster You Don’t Want to Skip)
This syrup is where the magic happens. It’s the thing that soaks into the sponge layers and gives that unmistakable, rich coffee flavor that makes every bite taste like a cozy espresso moment.
Here’s how I made it:
In a small saucepan, I combined:
- 60 ml water
- 50g caster sugar
- 3 teaspoons of espresso powder
I stirred the mixture gently over medium heat until the sugar dissolved completely, no need to boil, just heat it enough that everything melts together smoothly.
Once it was off the heat, I added 2 tablespoons of Kahlua (totally optional, but highly recommended if you want that subtle kick of warmth and depth). No Kahlua? You can swap it for a splash of brandy, cognac, or even just a bit more espresso.
Let the syrup sit out and cool naturally while you prep the rest. I usually make it early on so it’s ready to go when I’m layering.
It might seem like a tiny step, but trust me, once that coffee syrup soaks into the sponge, it transforms everything. It gives the cake this deep, café-style richness that makes it feel like something you’d get from a high-end patisserie, not your own kitchen.
Dark Chocolate Ganache (The Smooth, Rich Layer That Holds It All Together)
There’s just something about a good ganache. It’s creamy, glossy, and basically chocolate therapy in a bowl. For this recipe, we’re not looking for a runny drizzle, we need a thick, pipeable ganache that holds its shape and adds richness between the layers.
Here’s how I made mine:
I started by finely chopping 250g of dark chocolate (around 55% cocoa works beautifully here) and placing it in a heat-safe bowl. You want it ready and waiting.
In a small saucepan, I heated up 300ml of heavy cream, not to a full boil, but until it was just starting to simmer. As soon as it reached that point, I took it off the heat and poured it straight over the chocolate.
Let it sit for about 2 minutes, this gives the chocolate time to soften without stirring too early. Then, using a rubber spatula, I stirred gently from the center outward until the mixture turned glossy and smooth.
Once everything was fully melted and silky, I added in 25g of room temperature butter for extra creaminess and shine. A quick blend with my hand mixer (or stick blender) helped emulsify everything into a luscious, thick ganache.
At this stage, the ganache will still be a bit too soft for layering. So I transferred it to a piping bag and left it on the counter to cool and firm up. If you’re in a rush or your kitchen is warm, pop it in the fridge for a few minutes, just don’t forget about it or it’ll go too stiff.
You’ll know it’s ready when it holds its shape when piped, like frosting that’s just shy of being whipped. That’s your cue to move on to the layering stage.
Chocolate Crunch with Coffee (The Layer That Brings the Snap)
This is the part that surprises people, that bite of texture sandwiched between all the creaminess. It’s chocolatey, nutty, coffee-kissed, and just crunchy enough to keep things interesting.
To make it, I started by melting 45g of milk chocolate in a small saucepan. Low heat and patience are key here, don’t rush it or you’ll risk burning the chocolate. Once it was silky smooth, I took it off the heat.
Into that warm chocolate, I stirred in:
- 1 tablespoon of Nutella (for that rich, hazelnut depth)
- 65g of feuilletine (those golden, crispy flakes, if you know, you know)
- 2 teaspoons of espresso powder
- a pinch of salt (always, salt makes chocolate taste more like chocolate)
I mixed until everything was well coated and the mixture looked crumbly but cohesive, kind of like a fancy grown-up version of cereal bark.
Once it cooled slightly, I transferred the crunch mixture into an airtight container and left it on the kitchen counter to hang out at room temp. No need to refrigerate it unless your kitchen is hot, we want it spreadable, not rock solid.
This layer goes on thin when assembling, but trust me, you’ll taste it in every bite. It adds a little “oh hello” moment to the cake.
French Coffee Buttercream (The Creamy, Dreamy Layer That Ties It All Together)
This buttercream is what makes the whole cake feel extra luxe. It’s smooth, rich, and carries just the right hit of coffee, not overpowering, but enough to make your taste buds perk up.
Here’s how I made it step-by-step:
First, I dissolved 3½ teaspoons of espresso powder in 1½ tablespoons of boiling water, then set it aside to cool. That’ll go in at the end for flavor.
In a separate mixing bowl, I whipped up 6 egg yolks using a hand mixer until they turned thick, pale, and creamy, this takes a few minutes, but you want to get some volume going.
While that was mixing, I made a sugar syrup by combining 120g caster sugar and 50ml water in a small saucepan. I stirred until the sugar fully dissolved, then let it cook until it reached 116°C (240°F), use a thermometer here, it matters.
The second it hit 116°C, I slowly poured the hot syrup into the egg yolks while mixing on high speed. This step turns it into a thick, glossy base that almost looks like a custard. Keep whisking until the bowl isn’t hot to the touch anymore, usually around 7–10 minutes.
Now comes the magic: I gradually added 230g of room temp butter, one spoonful at a time, mixing on medium speed. At first it might look a little split or weird, don’t panic, keep going. It’ll come together into a silky, stable buttercream.
Last step: I stirred in the cooled espresso mixture to bring that coffee flavor to life.
And that’s it! I piped it into a bag and left it at room temp until I was ready to layer. Just make sure it’s soft enough to spread but not melty.
Assembling the Layers (Where Everything Comes Together)
Now for the fun part: stacking all those rich, dreamy layers into one impressive showstopper. Here’s how I built it, step by step.
Start by grabbing your cake base (the one with the cocoa biscuit layer) from the fridge. Brush on a thin layer of melted milk chocolate, this helps anchor the first sponge layer so it doesn’t slide around.
Next, place your first round of joconde almond sponge right on top. Gently press it down to level it out (I like using the bottom of a glass for this). Then generously brush it with the cooled coffee syrup. You want it moist, not soggy.
Pop it into the freezer for 10–15 minutes so the syrup soaks in and the surface sets. This step makes layering easier and cleaner.
Once your sponge is in place and brushed with syrup, grab the chocolate crunch and gently press a thin layer across the top.
You don’t need a thick slab, just enough to lightly coat the surface without overwhelming it. After that, slide the cake into the freezer for about 10 to 15 minutes. This helps lock in the crunch so it holds its shape when you build the next layer.
After the crunch has set, it’s time for the ganache. Spread it on generously (about 1 cm thick), making sure it goes edge to edge.
Use a spoon or offset spatula to level it out until it’s smooth. Then, once again, freeze the cake briefly, this quick chill keeps the layers clean and defined when you slice into it later.
Then do the same with the French coffee buttercream: 1 cm thick, smooth it out, and back into the freezer for another short chill.
Repeat the whole layering sequence: sponge (brushed with coffee syrup), crunch, ganache, buttercream. The key here is patience, those quick freezer sessions between each layer are what keep the final cake clean and sharp when you slice it.
Once all the layers are stacked and set, wrap the cake well and freeze it overnight. That gives everything time to firm up and settle so it’s ready for mousse, glaze, and all the fancy finishing touches.
Almond Coffee Mousse (For Enrobing the Cake)
This mousse is the final embrace, the silky coat that wraps the whole cake and pulls it all together. Creamy, nutty, and coffee-kissed, it’s what makes this cake feel like it belongs in a Paris patisserie window (except you made it, probably in your pajamas, and that’s even better).
Start with the almond paste. I tossed roasted, blanched almonds into my mini food processor, added icing sugar and a splash of neutral oil, and blended until it turned into a smooth, creamy nut butter. (Don’t rush this, grainy paste will ruin the texture.)
Next, I melted the white chocolate gently over a bain-marie. Once it was silky and smooth, I stirred in the almond paste until it all looked like one dreamy mixture. Set that aside.
While that’s cooling, I soaked the gelatin sheets in cold water for about 5–10 minutes until they were soft and plump.
Then, I heated 115 ml of the heavy cream in a small saucepan with the espresso powder, just until it started steaming. Whisk out any clumps so it’s smooth, then take it off the heat and stir in the softened gelatin until fully dissolved.
Now pour the hot espresso cream into the almond-chocolate base. Stir gently from the center outward with a spatula until it’s glossy and smooth. Let it cool to lukewarm, not cold, not hot. Just warm enough that it won’t melt the cream when you fold it in later.
In a separate bowl, I whipped the remaining 185 ml of cream until it was soft and pillowy (think: cloud, not stiff peaks).
I started by mixing just a spoonful of the whipped cream into the almond base to loosen it up, like easing into the pool instead of cannonballing in. Then I gently folded in the rest, one soft scoop at a time, until the whole thing looked cloud-light but sturdy enough to hug the cake without collapsing.
Now comes the magic moment. Grab your frozen, fully assembled cake. Place a silicone mold (I used an 18 cm round one) on a small board or tray, and line it with acetate if your cake is tall.
Pour about half the mousse into the bottom of the mold. Gently lower your cake in, buttercream side down. Pour the rest of the mousse around and over it, smoothing the top.
Tap the mold on the counter a few times to knock out any air bubbles. Then freeze the whole thing overnight so the mousse sets firm enough for that glossy glaze moment on Day 3.
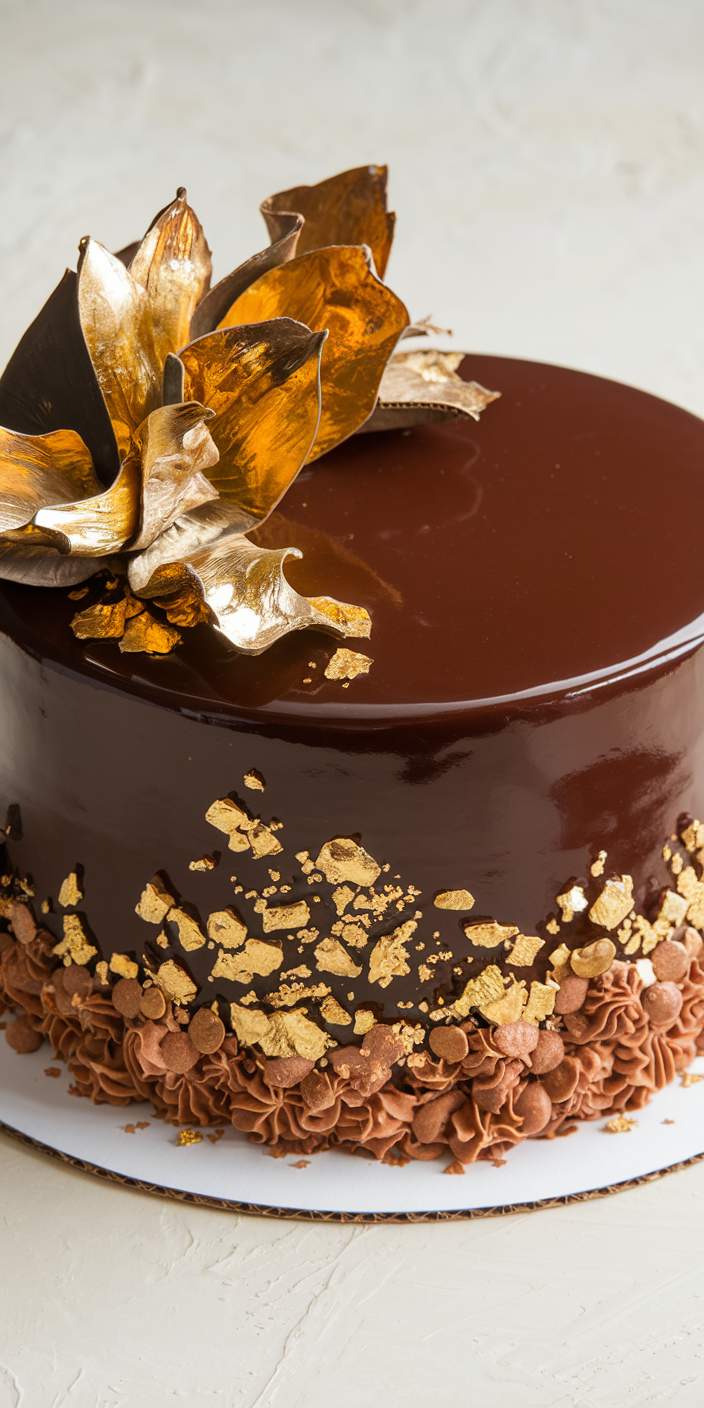
Milk Chocolate Mirror Glaze (That glossy final layer)
This is the step that gives your cake that ultra-smooth, mirror-like shine, the kind that makes people stop and stare. And the process? Surprisingly doable if you follow the flow and trust the temps.
Start by softening your gelatin sheets in cold water for about 5–10 minutes. While they bloom, chop up your milk chocolate nice and fine and set it in a heat-safe jug or bowl.
Start by warming up the sugar, water, cream, and glucose syrup together in a small saucepan. You don’t want it to fully boil, just heat it until it’s steaming and almost bubbling, then take it off the heat.
While it’s still hot, grab your pre-soaked gelatin (make sure you’ve squeezed out the extra water) and stir it into the mix until it melts in completely. Once that’s done, pour everything over your chopped milk chocolate.
Let it sit quietly for about a minute to soften the chocolate, then go in with your hand blender. Blend it gently at a slight tilt, this helps avoid whipping in unwanted air bubbles.
If you’re aiming for a soft beige finish for the glaze, now’s the time to add a little bit of white and black coloring to adjust the tone.
Once your glaze is fully blended and smooth, press a layer of cling film right up against the surface, this helps avoid that weird skin forming on top.
Then, set it aside and let it cool to around 34–35°C. I know it sounds oddly specific, but that temp really is the sweet spot for a flawless, glassy finish.
Now make sure your cake is fully frozen and ready to go. Pop it onto a wire rack with some parchment underneath to catch the drips, saves a lot of cleanup later.
When the glaze hits that ideal temp, pour it gently right into the middle of the cake and let gravity do its thing. It’ll naturally coat the sides in the prettiest way, no fancy tricks needed. Try not to overwork it, the less you fuss, the better it flows.
Use a palette knife to gently swipe around the base to clean up any excess. Transfer the cake to your serving plate and let it rest at room temp for about 10 minutes to settle and shine.
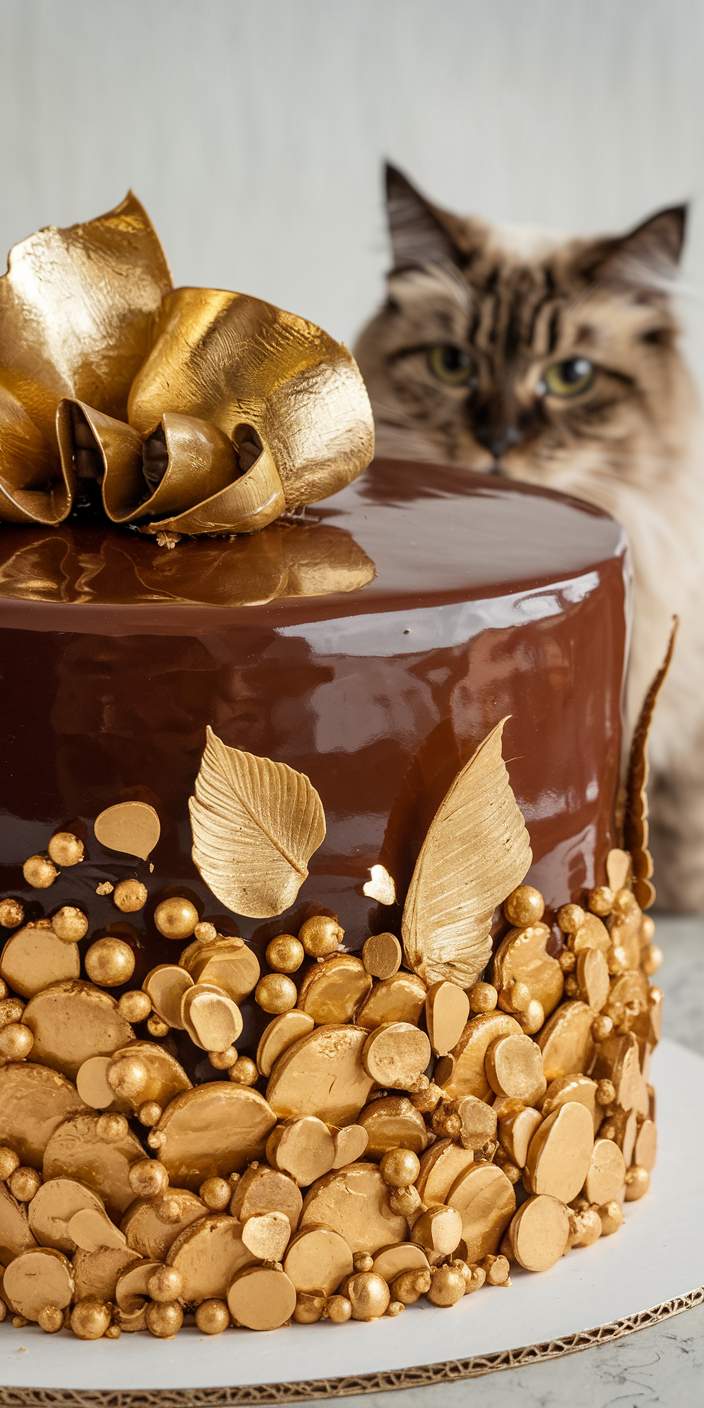
Now for the final touch: carefully place your gold leaf garnish right on top while the glaze is still slightly tacky. It’s the little luxury that says, “Yep, I made this.”
Serving And Presentation Tips

Okay, so you’ve stacked, spread, drizzled, and maybe whispered a few sweet nothings to your Classic French Opera Cake. Now comes the fun part, serving it like the masterpiece it is.
I like to think of this moment as the “ta-da!” It’s where all those buttery, chocolatey layers get to shine.
Here’s how I love to present mine:
✓ Gold leaf = instant drama. I gently press those fluttery pieces right on top. They catch the light and make people pause before they even take a bite. (So extra. So worth it.)
✓ Add a pop of color. A few raspberries or sliced strawberries on the side if you like. Chef’s kiss. The tartness balances all that richness, and they look gorgeous next to the dark chocolate glaze and creamy coffee buttercream layers.
✓ Cut it like a jewel box. I use a hot knife (run under water, wiped clean between slices) and slice into neat squares. That cross-section? Total eye candy.
✓ Plating matters, but keep it simple. I usually serve each slice on a white plate with a swoosh of extra ganache. No pressure to be fancy, just enough to say, “I made this with love.”
✓ Cake stand moment. If you’ve got one, this is the time to pull it out. A white or glass cake stand really lets the cake steal the show. It turns your table into a tiny patisserie—so cute, right?
And honestly? If it’s just you, a cozy candle, and a slice of this cake after a long day… that’s a perfect presentation too.
Make it pretty, make it you, and enjoy every last bite.
Final Touch: A Sprinkle of Gold and a Big Exhale
When I finally placed the last piece of gold leaf, I actually gasped a little. I stood back and thought, “Did I just make this?” And yes, yes I did. With my messy apron and all.
It’s not about perfection. Mine wasn’t bakery-perfect, and I loved it more for that. Every bite was full of flavor and effort, and that’s what made it feel special.
So if you’ve been craving a kitchen moment that feels a little luxe, a little challenging, and a whole lot satisfying, this is your sign. Bake the cake. Play the music. Dust off your prettiest plate.
And when you take that first bite? Let yourself feel just a little fancy.
Because home is where the good desserts (and the good stories) live.
Frequently Asked Questions
Where Did You Get This Cake Recipe From?
I wanted to do this so bad and got inspired by Louise Lindberg Pastry. She explained how she does her version in her video below. If you want her full recipe, you will have to purchase from her. What I’ve done is try to mimic what she has done and came up with my own version, thought I share it with you.
I often get questions about opera cake, especially about its layers, ingredients, and how it differs from other desserts. Here are some common inquiries I receive.
How many layers does an opera cake traditionally have?
An opera cake usually has five layers. The classic structure includes layers of almond sponge cake, coffee buttercream, chocolate ganache, and sometimes a soaking syrup. This combination creates a rich and flavorful experience.
What are the typical ingredients found in an opera cake?
Typical ingredients include almond flour, eggs, butter, sugar, and coffee. The cake often features a chocolate ganache made from dark chocolate and cream. These ingredients come together to create its signature taste and texture.
Could you share an easy recipe for making opera cake at home?
Sure! A simple recipe includes making a Joconde sponge, layering it with coffee buttercream and chocolate ganache. The process involves baking the sponge, cooling it, and carefully assembling the layers. I can provide a more detailed recipe if you’d like.
How does opera cake differ from tiramisu in terms of composition and taste?
Opera cake and tiramisu differ mainly in their ingredients and texture. Opera cake has a layer of almond sponge and buttercream, while tiramisu uses ladyfingers soaked in coffee. The flavors are distinct, with opera cake being richer due to butter and chocolate.
What are some popular variations of the classic opera cake?
Popular variations include fruit flavors like raspberry or passion fruit, which add a tart contrast to the sweet layers. Some bakers also experiment with different chocolates or even add herbs for a unique twist.
Classic French Opera Cake
A luxurious French dessert made with layers of almond sponge soaked in coffee syrup, rich chocolate ganache, and silky coffee buttercream, all wrapped in almond mousse and finished with a glossy mirror glaze and gold leaf. Perfect for special occasions or when you want to impress with a showstopping cake.
Ingredients
Cocoa Biscuit Base with Coffee
- 125 g digestive or butter biscuits
- 60 g melted butter
- 1 tbsp cocoa powder
- ½ tsp espresso powder
- Pinch of salt
- A bit of melted milk chocolate (for sticking layers)
Joconde Almond Sponge (2 layers)
- 170 g almond flour
- 105 g caster sugar
- 200 g eggs
- 130 g egg whites
- 55 g caster sugar (for meringue)
- 35 g all-purpose flour
- 25 g melted butter
Coffee Syrup
- 50 g caster sugar
- 3 tsp espresso powder
- 60 ml water
- 2 tbsp Kahlua (optional, or swap with more coffee/brandy/cognac)
Dark Chocolate Ganache
- 300 ml heavy cream
- 250 g dark chocolate (55%)
- 25 g butter, softened
Chocolate Coffee Crunch
- 45 g milk chocolate
- 1 tbsp Nutella
- 65 g feuilletine (or crushed cornflakes)
- 2 tsp espresso powder
- Pinch of salt
French Coffee Buttercream
- 3½ tsp espresso powder
- 1½ tbsp boiling water (to dissolve espresso)
- 50 ml water
- 120 g caster sugar
- 6 egg yolks
- 230 g butter, room temperature
Almond Coffee Mousse (for enrobing)
- 2⅓ gelatin sheets (1.75 g each, bloom 240)
- 80 g white chocolate
- 80 g almond nut paste (made from roasted blanched almonds, icing sugar, and neutral oil)
- 300 ml heavy cream (115 ml to heat + 185 ml to whip)
- 1½ tsp espresso powder
Milk Chocolate Mirror Glaze
- 6 gelatin sheets (1.75 g each, bloom 240)
- 150 g milk chocolate
- 100 ml heavy cream
- 50 ml water
- 150 g caster sugar
- 150 g glucose syrup
- Optional: red, yellow, black, white food coloring paste
Final Garnish
- Edible gold leaf sheets
Nutrition Information:
Yield: 12 Serving Size: 1Amount Per Serving: Calories: 1142Total Fat: 78gSaturated Fat: 41gTrans Fat: 2gUnsaturated Fat: 31gCholesterol: 293mgSodium: 387mgCarbohydrates: 97gFiber: 5gSugar: 82gProtein: 20g
This website contains affiliate links. As an Amazon affiliate, I earn from qualifying purchases (What’s This?).

Ummm this sounds amazing, but you actually don’t say how long to cook the cake layers, my friend. The actual instructions are a little vague, so it would be wonderful to have a little more detail. The presentation looks amazing.
Hey Lori, thanks for being here and your feedback. I’d be updating this with more detail, appreciate you!
Hi, the cake looks amazing! However I’m confused about the buttercream. In the ingredients you have butter, powdered sugar, espresso powder and vanilla, but in the instructions you say eggs butter and sugar. I’ve never heard of egg yolks in a buttercream. Please clarify
Hi Cathy, thanks for being here and for noticing that! You’re right to be confused. Let me clarify the buttercream part:
In the French coffee buttercream, the egg yolks are indeed used, which might be a bit different from the classic buttercream recipe. This particular buttercream is a type of French buttercream, which combines egg yolks with hot sugar syrup. This gives the buttercream a rich, smooth, and velvety texture that pairs with the flavors of coffee and chocolate in this cake.
I’ve since added more detail. Will be editing this along the way to make it better.
Hope that clears up the confusion! 😊 Enjoy baking this gorgeous cake, and feel free to reach out with any more questions!
Hi
Would love to make your recipe but is it possible to get some answers. What is the size of the your tray to bake the joconde cake?
If I don’t have the mold can I do it in a ring the same size ? Thank you for your help
Hey Nadia, my tray came with my Bosch oven, so it’s huge, about 17 by 14 inch. Got to have it big enough to fit at least 2 sponge 16cm diameter each. You can try this 13 by 18 inch KitchenAid tray.
Yes, if you don’t have the mold, you can do it in a ring about 6 to 7cm tall, that’s fine. Thanks for your questions, really appreciate you being here 🙂